
Project Overview
This project investigates the implementation and artistic application of toon/cel shaders for low-poly 3D games using Unity’s Universal Rendering Pipeline (URP). Through comprehensive research and technical development, I created a complete non-photorealistic rendering framework that combines Shader Graph for visual shader creation with custom C# scripts for advanced rendering features. Inspired by the distinctive visual styles of games like Hi-Fi Rush and Borderlands, this shader system demonstrates how technical sophistication in rendering can complement geometric simplicity to create visually striking games with strong artistic direction.
Development Time: 1 month
Team Size: Solo project
Role: Graphics Programmer & Technical Artist
Platform: Unity
Screenshots


Research Focus
This investigation explores several key areas of non-photorealistic rendering:
Technical Implementation: How toon shading techniques can be implemented using modern Unity tools (Shader Graph, URP)
Artistic Versatility: Achieving different art styles within a cohesive low-poly aesthetic framework
Visual Longevity: Creating graphics that resist technical aging through stylization
Shader Optimization: Balancing visual quality with performance for low-poly games
Custom Rendering: Extending Unity’s render pipeline for specialized effects
Key Features
🎨 Advanced Toon Shader System
Light Banding
- Quantized lighting into three distinct bands (full-light, mid-tone, shadow)
- Hard transitions between light levels for classic cel-shaded appearance
- Customizable band thresholds for different artistic styles
- Optimized for low-poly geometry with minimal light complexity
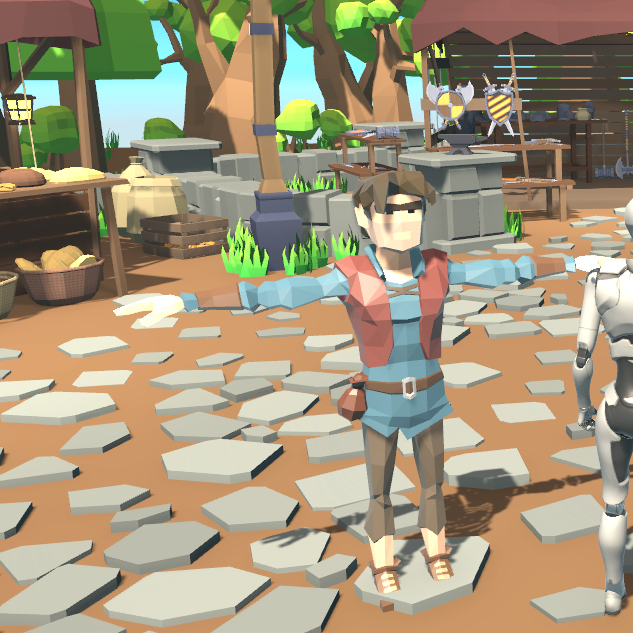
Figure 1: Low-Poly Model before applying the toon shader
Rim Lighting
- Enhanced edge definition highlighting object silhouettes
- Adjustable color, intensity, and width parameters
- Particularly effective on low-poly models, emphasizing geometric qualities
- Inspector-accessible controls for real-time artistic adjustments
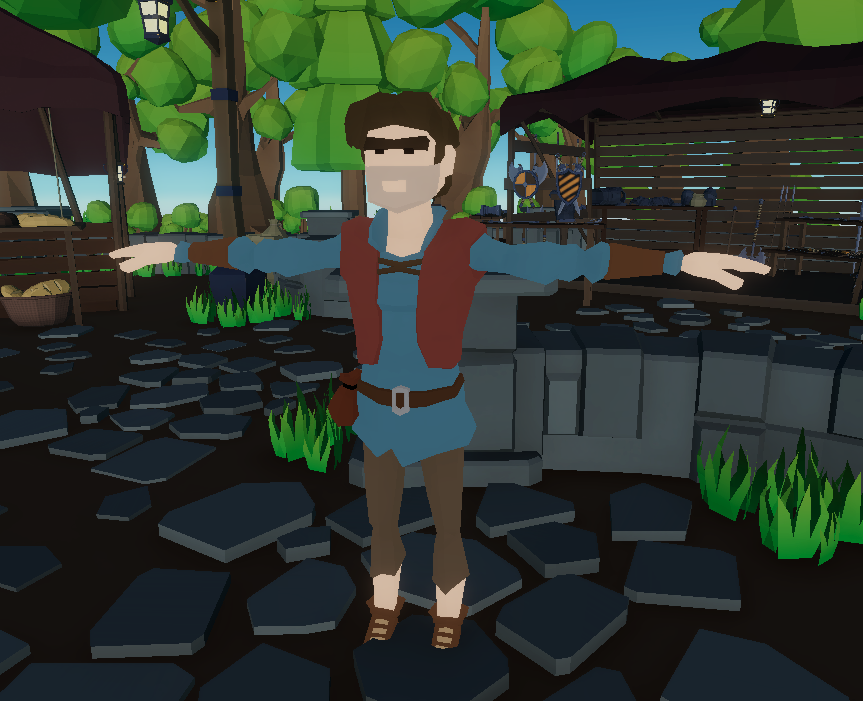
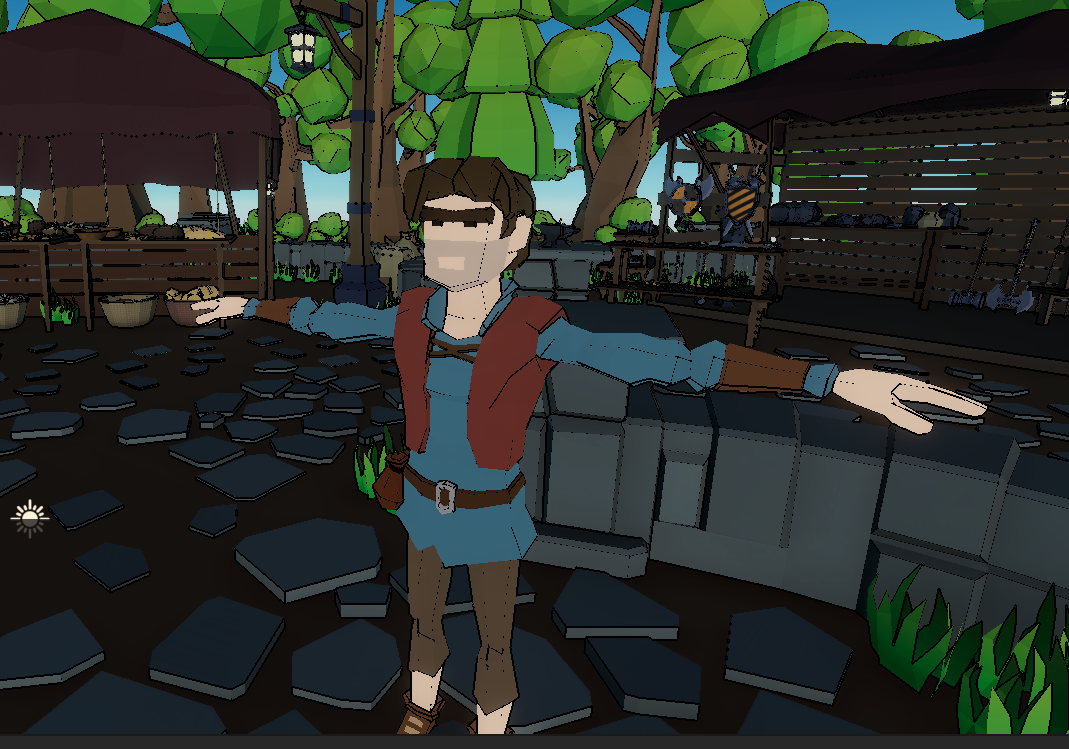
Figure 2: Low-Poly Model after applying the toon shader

Figure 3: Low-Poly Model with adjusted shadows
Material Properties
- Customizable base colors and tint options
- Specular highlights with controllable intensity
- Shadow color control for artistic expression
- Support for texture-based variations
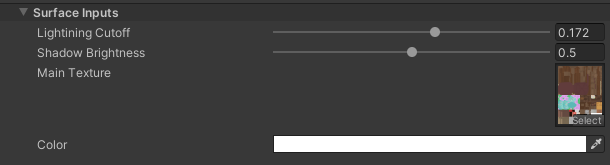
Figure 3: Adjustable toon shading in Unity Inspector
🖼️ Custom Outline System
Hybrid Outline Approach
- Combination of normal-based and depth-based edge detection
- Consistent rendering across varied geometry types
- Addresses challenges specific to low-poly models with sharp edges
- Adjustable outline thickness and color
Post-Processing Integration
- Implemented as custom render feature in URP
- Processes entire scene for unified outline style
- Better performance than traditional vertex extrusion methods
- Maintains outline consistency during camera movement

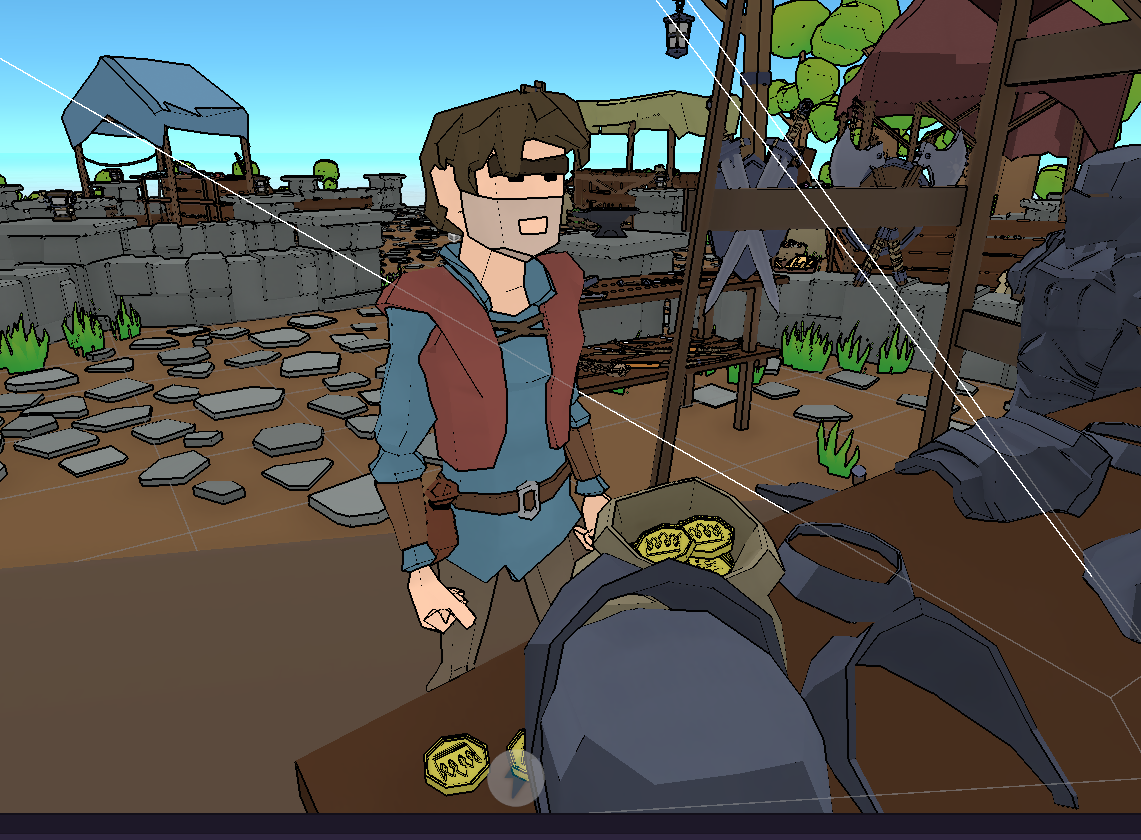
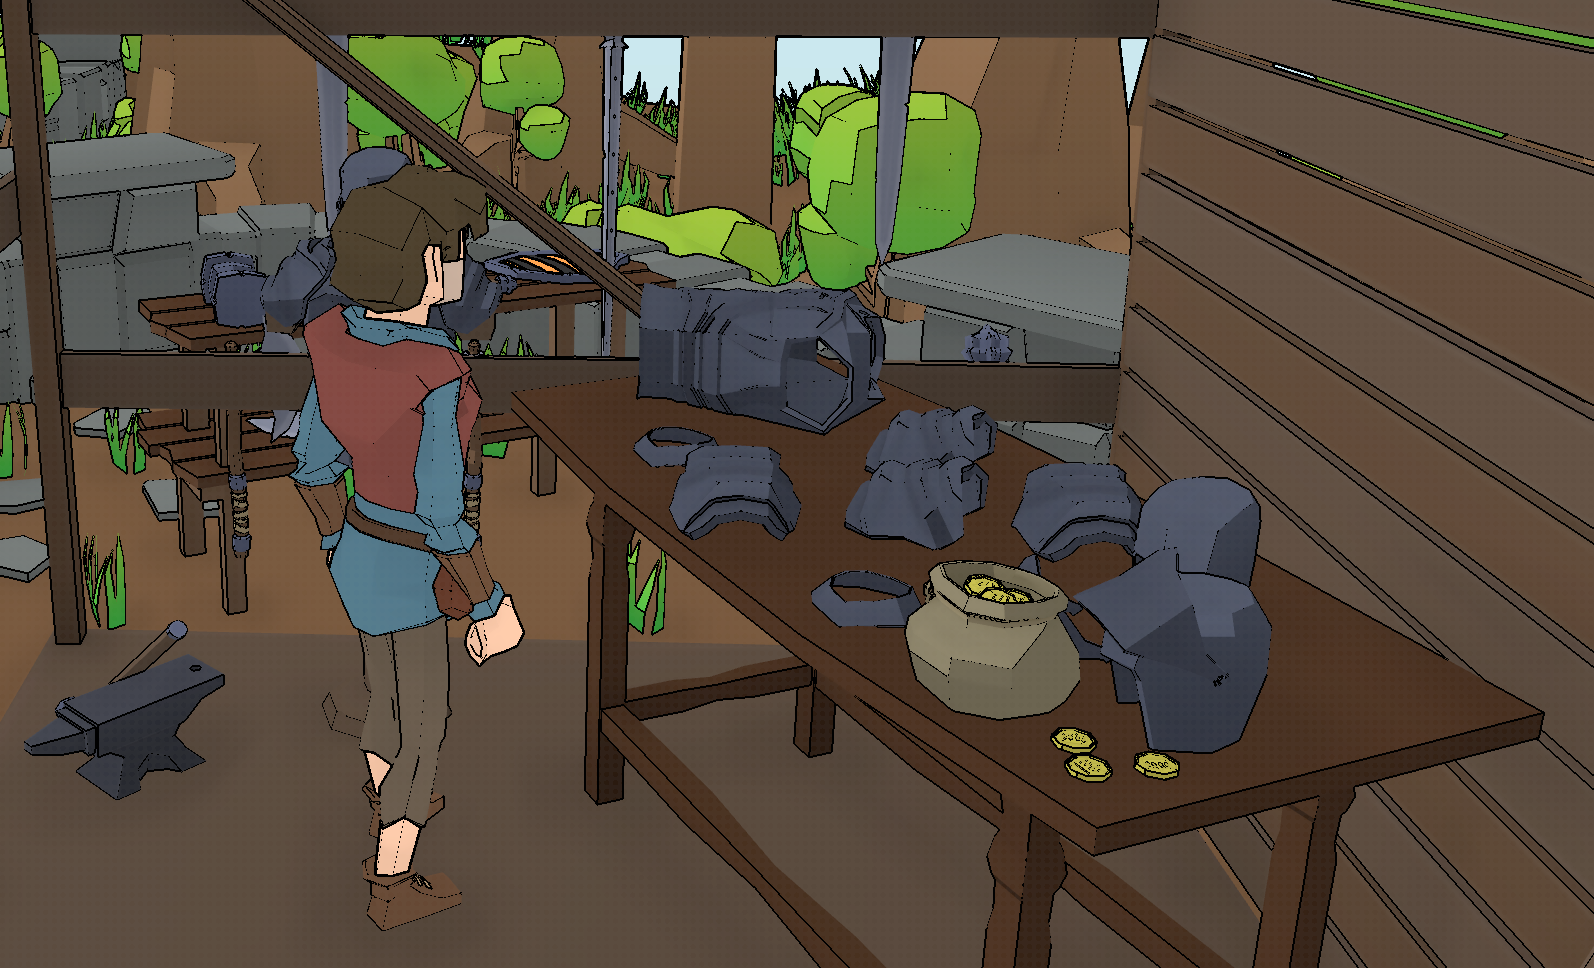
Figure 4: Outline on the environment and character model
Custom Bloom Effect (Hi-Fi Rush Style)
Scriptable Render Pipeline Implementation
- Three custom C# scripts extending Unity’s URP
- Multi-pass Gaussian bloom with down-sampling and up-sampling
- Texture-based masking instead of camera-based application
- Superior artistic control compared to Unity’s standard bloom
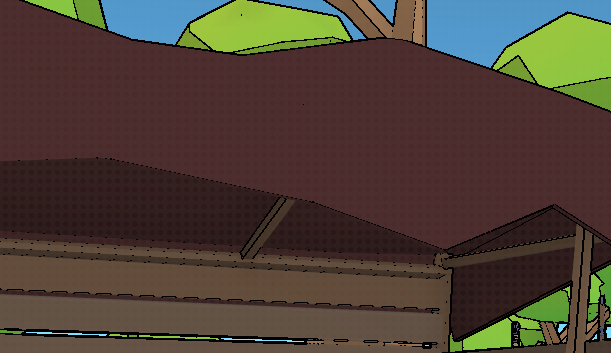
Figure 5: Custom Bloom applied to the scene
Customizable Parameters
- Threshold control for bloom activation
- Intensity adjustment for effect strength
- Scatter control for bloom spread
- Color tint for stylistic variations
- All parameters exposed in Unity Inspector
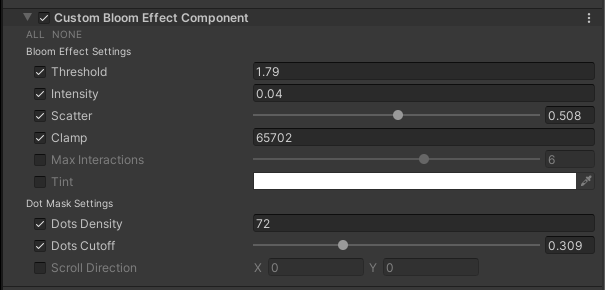
Figure 6: Adjustable Bloom Effect in Unity Inspector
Technical Implementation
Shader Graph Architecture
Base Toon Shader
The core toon shader uses node-based visual programming in Shader Graph:
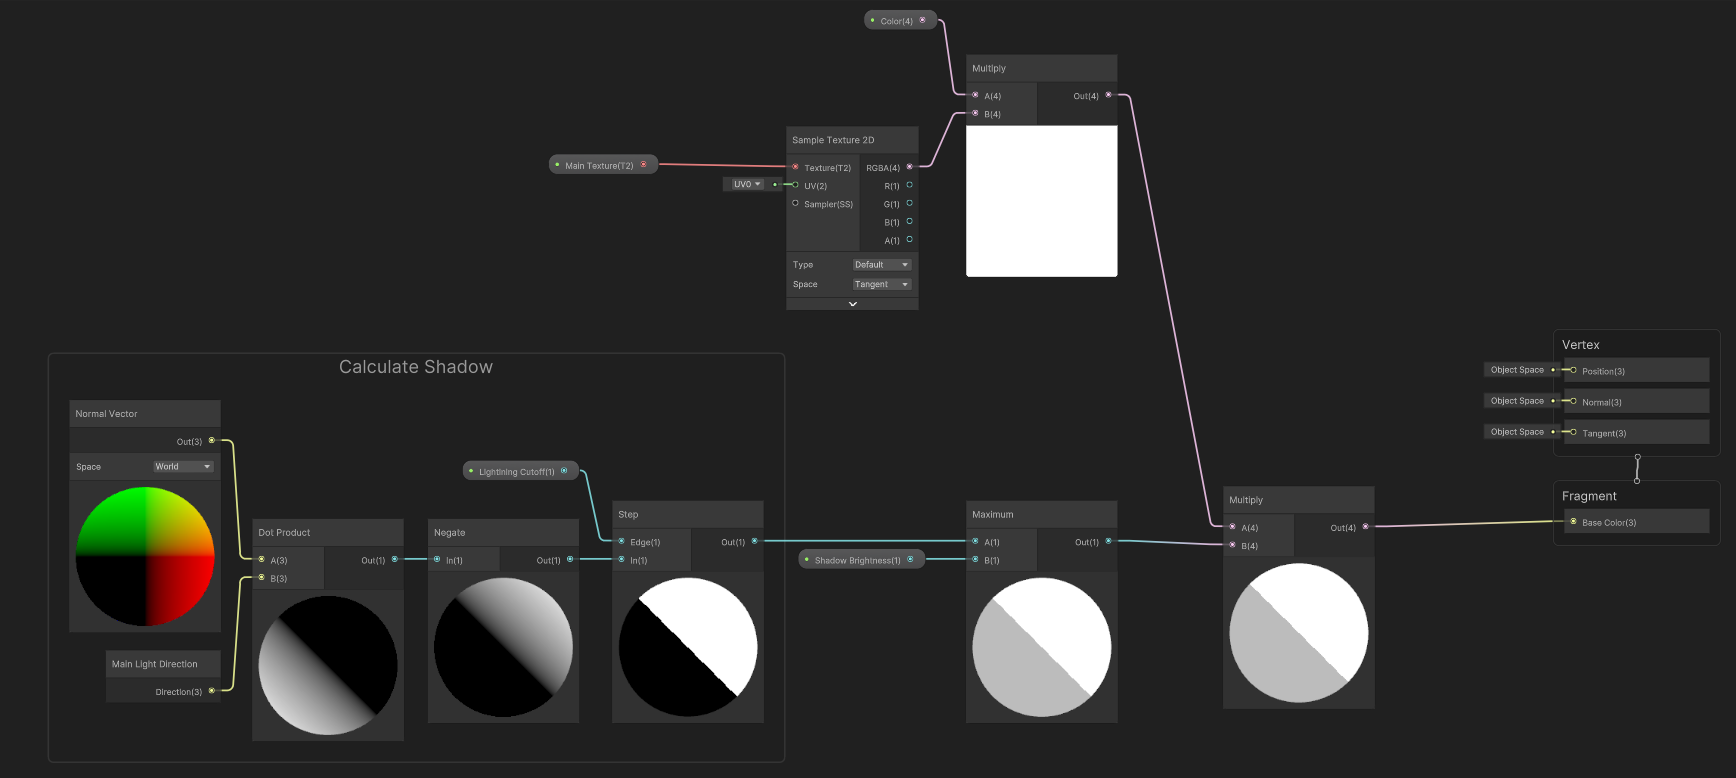
Figure 7: Toon Shader Graph
1
2
3
4
5
6
7
8
9
10
11
12
13
14
15
Main Shader Pipeline:
├── Light Calculation
│   ├── Dot Product (Normal · Light Direction)
│   ├── Step Function (Quantization)
│   └── Band Thresholds (3 levels)
├── Rim Lighting
│   ├── View Direction Calculation
│   ├── Fresnel Effect
│   └── Rim Intensity Control
├── Color Processing
│   ├── Base Color Application
│   ├── Shadow Color Blending
│   └── Specular Highlights
└── Output
    └── Surface Shader Output
Key Implementation Details
- Light banding achieved through step functions applied to light calculations
- Three-band system (full-light, mid-tone, shadow) optimal for low-poly aesthetics
- Rim lighting using view-dependent calculations for edge enhancement
- All parameters exposed as shader properties for Inspector control
Outline Shader Graph
Hybrid approach combining multiple detection methods:
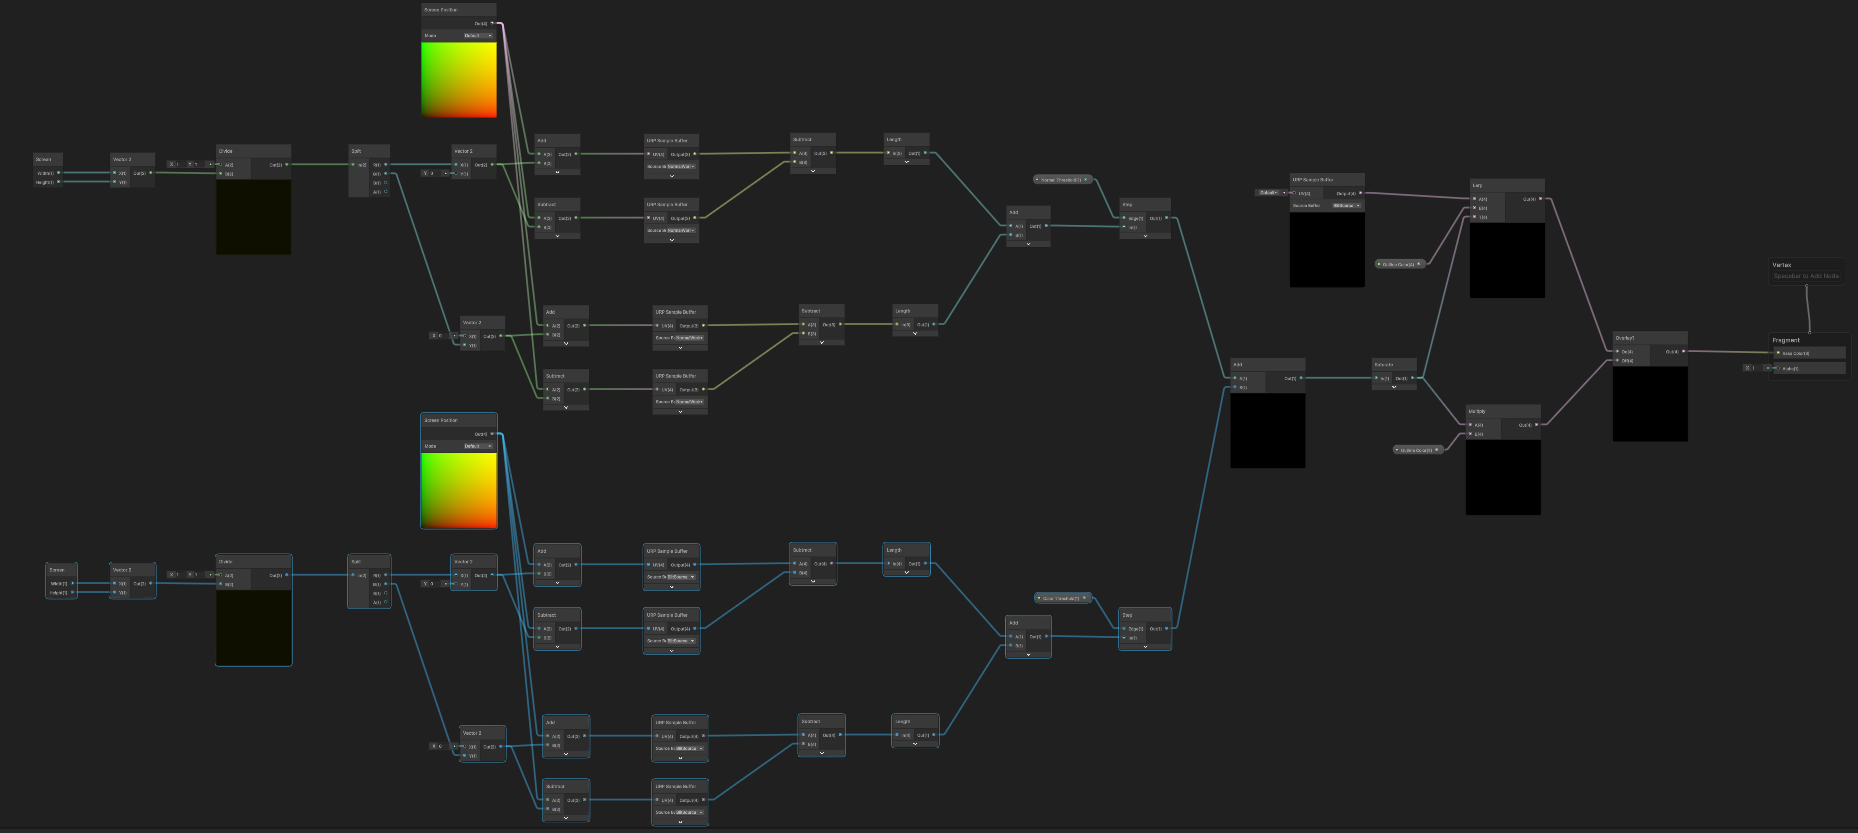
Figure 8: Outline Shader Graph
1
2
3
4
5
6
7
8
9
10
11
12
13
14
Outline Pipeline:
├── Normal-Based Detection
│   ├── Camera-space normal calculation
│   ├── Edge angle threshold
│   └── Silhouette identification
├── Depth-Based Detection
│   ├── Depth buffer sampling
│   ├── Depth discontinuity detection
│   └── Internal edge identification
├── Outline Rendering
│   ├── Thickness calculation
│   ├── Color application
│   └── Anti-aliasing smoothing
└── Composite Output
Innovation: This hybrid approach solves the common problem of inconsistent outlines on low-poly models by combining both silhouette and internal edge detection.
Custom Bloom Effect Shader Graph
Shader Graph in combination with unity bloom effect via scripting
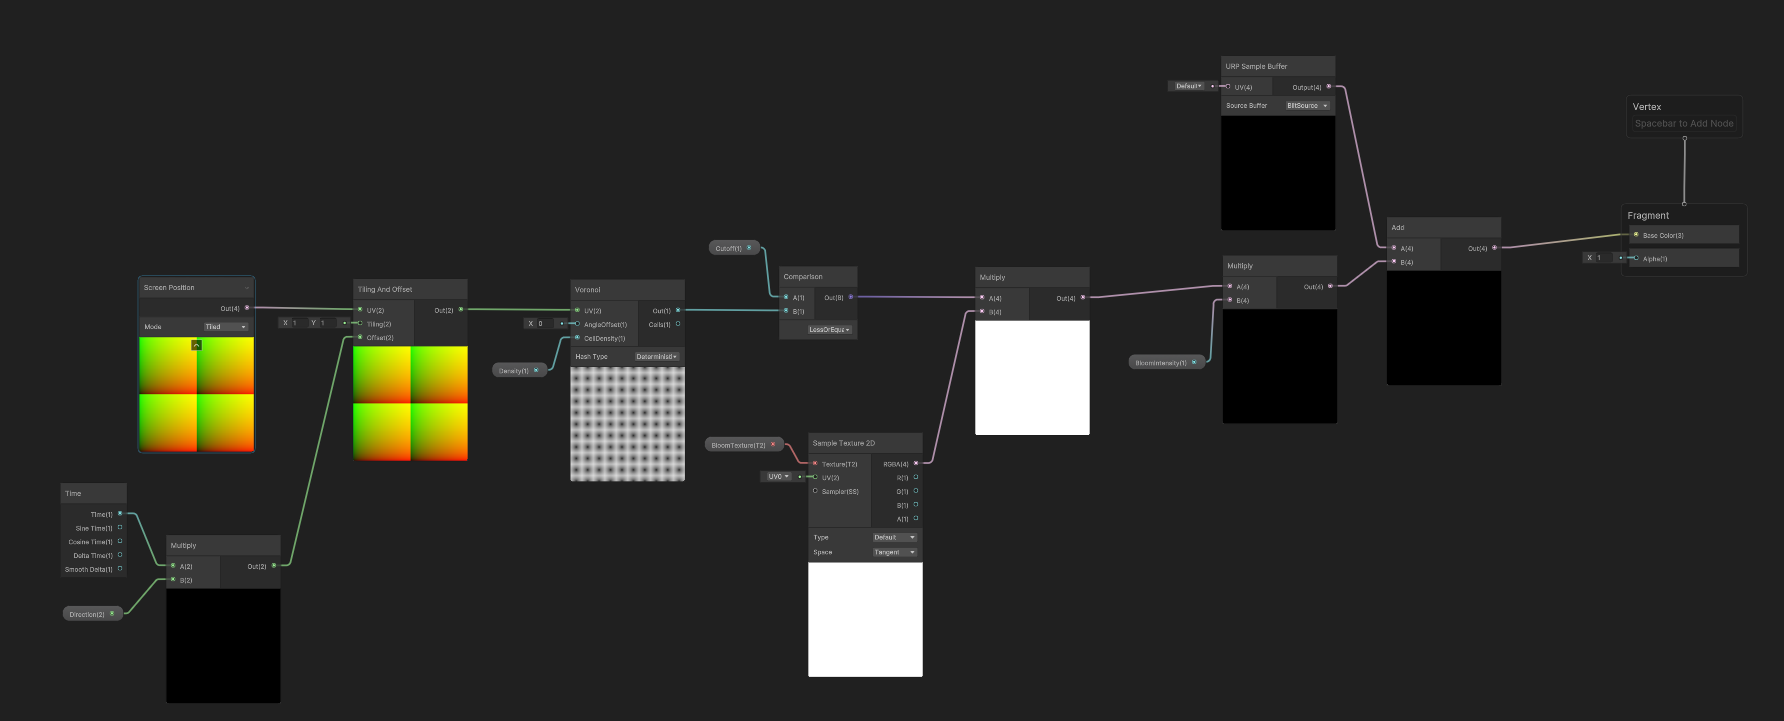
Figure 9: Custom Bloom Shader Graph
Custom Render Pass System
Implemented through three interconnected C# scripts:
CustomBloomEffectComponent.cs
1
2
3
4
5
6
7
8
9
10
11
12
13
14
15
16
17
18
19
20
21
22
23
24
25
26
27
28
using UnityEngine;
using UnityEngine.Rendering;
using UnityEngine.Rendering.Universal;

[VolumeComponentMenuForRenderPipeline ("Custom/CustomBloomEffectComponent", typeof(UniversalRenderPipeline))]
public class CustomBloomEffectComponent : VolumeComponent, IPostProcessComponent
{
    [Header("Bloom Effect Settings")]
    public FloatParameter threshold = new FloatParameter(0.9f, true);
    public FloatParameter intensity = new FloatParameter(1, true);
    public ClampedFloatParameter scatter = new ClampedFloatParameter(0.7f, 0, 1, true);
    public IntParameter clamp = new IntParameter(65472, true);
    public ClampedIntParameter maxInteractions = new ClampedIntParameter(6, 0, 10);
    public NoInterpColorParameter tint = new NoInterpColorParameter(Color.white);

    [Header("Dot Mask Settings")]
    public IntParameter dotsDensity = new IntParameter(10, true);
    public ClampedFloatParameter dotsCutoff = new ClampedFloatParameter(0.4f, 0, 1, true);
    public Vector2Parameter scrollDirection = new Vector2Parameter(new Vector2());

    public bool IsActive(){
        return true;
    }

   public bool IsTileCompatible(){
        return false;
    }
}
Features:
- Inspector-friendly volume parameter system
- Clamped values prevent invalid configurations
- Tooltips for designer accessibility
- Integration with Unity’s volume system
CustomPostProcessPass.cs
Core rendering logic implementing multi-pass bloom:
1
2
3
4
5
6
7
8
9
10
11
12
13
14
15
16
17
18
19
20
21
22
23
24
25
26
27
28
29
30
31
32
33
34
35
36
37
38
39
40
41
42
43
44
45
46
47
48
49
50
51
52
53
54
55
56
57
58
59
60
61
62
63
64
65
66
67
68
69
70
71
72
73
74
75
76
77
78
79
80
81
82
83
84
85
86
87
88
89
90
91
92
93
94
95
96
97
98
99
100
101
102
103
104
105
106
107
108
109
110
111
112
113
114
115
116
117
118
119
120
121
122
123
124
125
126
127
128
129
130
131
132
133
134
135
136
137
138
139
140
141
142
143
144
145
146
147
148
149
150
151
152
153
154
155
156
157
158
159
160
161
162
163
164
165
166
167
168
169
170
171
172
173
174
175
176
177
178
179
180
181
182
183
184
185
186
187
188
189
190
191
192
193
194
195
196
197
198
199
200
using UnityEngine;
using UnityEngine.Experimental.Rendering;
using UnityEngine.Rendering;
using UnityEngine.Rendering.Universal;

[System.Serializable]
public class CustomPostProcessPass : ScriptableRenderPass
{
    private Material m_bloomMaterial;
    private Material m_compositeMaterial;
    private RenderTextureDescriptor m_Descriptor;

    // RTHandle is a Render Texture that scales automaticaly with the camera size
    private RTHandle m_CameraColorTarget;
    private RTHandle m_CameraDepthTarget;

    const int k_MaxPyramideSize = 16;
    private int[] _BloomMipUp;
    private int[] _BloomMipDown;

    private RTHandle[] m_BloomMipUp;
    private RTHandle[] m_BloomMipDown;

    private GraphicsFormat hdrFormat;
    private CustomBloomEffectComponent m_BloomEffect;

    private CameraData m_CameraData;

    public CustomPostProcessPass(Material bloomMaterial, Material compositeMaterial)
    {
        m_bloomMaterial = bloomMaterial;
        m_compositeMaterial = compositeMaterial;

        renderPassEvent = RenderPassEvent.BeforeRenderingPostProcessing;

        _BloomMipUp = new int[k_MaxPyramideSize];
        _BloomMipDown = new int[k_MaxPyramideSize];
        m_BloomMipUp = new RTHandle[k_MaxPyramideSize];
        m_BloomMipDown = new RTHandle[k_MaxPyramideSize];

        for (int i = 0; i < k_MaxPyramideSize; i++)
        {
            _BloomMipUp[i] = Shader.PropertyToID("_BloomMipUp" + i);
            _BloomMipDown[i] = Shader.PropertyToID("_BloomMipDown" + i);

            // Get name, will get Allocated with descriptor later
            m_BloomMipUp[i] = RTHandles.Alloc(_BloomMipUp[i], name: "_BloomMipUp" + i);
            m_BloomMipDown[i] = RTHandles.Alloc(_BloomMipDown[i], name: "_BloomMipDwon" + i);
        }

        const FormatUsage usage = FormatUsage.Linear | FormatUsage.Render;
        if (SystemInfo.IsFormatSupported(GraphicsFormat.B10G11R11_UFloatPack32, usage)) // HDR fallback
        {
            hdrFormat = GraphicsFormat.B10G11R11_UFloatPack32;
        }
        else
        {
            hdrFormat = QualitySettings.activeColorSpace == ColorSpace.Linear
                ? GraphicsFormat.R8G8B8A8_SRGB
                : GraphicsFormat.B8G8R8A8_UNorm;
        }
    }

    public override void OnCameraSetup(CommandBuffer cmd, ref RenderingData renderingData)
    {
        m_Descriptor = renderingData.cameraData.cameraTargetDescriptor;
        m_CameraData = renderingData.cameraData;
    }

    public override void Execute(ScriptableRenderContext context, ref RenderingData renderingData)
    {
        if (renderingData.cameraData.cameraType != CameraType.Game && renderingData.cameraData.cameraType != CameraType.SceneView)
            return;
        m_CameraData = renderingData.cameraData;
        m_CameraColorTarget = m_CameraData.renderer.cameraColorTargetHandle;
        m_CameraDepthTarget = m_CameraData.renderer.cameraDepthTargetHandle;

        VolumeStack stack = VolumeManager.instance.stack;
        m_BloomEffect = stack.GetComponent<CustomBloomEffectComponent>();

        // A command buffer is a list of rendering tasks that we want to perform
        CommandBuffer cmd = CommandBufferPool.Get();

        // Allows us to control how is visualised within the frame debugger
        using (new ProfilingScope(cmd, new ProfilingSampler("Custom Post Process Effect")))
        {
            if (m_CameraColorTarget == null) { Debug.LogError("Camera Color Target Null");  }
            // Do the bloom pass here first
            SetupBloom(cmd, m_CameraColorTarget);

            // Setup the compisite value
            m_compositeMaterial.SetFloat("_Cutoff", m_BloomEffect.dotsCutoff.value);
            m_compositeMaterial.SetFloat("_Density", m_BloomEffect.dotsDensity.value);
            m_compositeMaterial.SetVector("_Direction", m_BloomEffect.scrollDirection.value);

            Blitter.BlitCameraTexture(cmd, m_CameraColorTarget, m_CameraColorTarget, m_compositeMaterial, 0);

        }

        context.ExecuteCommandBuffer(cmd);
        cmd.Clear();

        CommandBufferPool.Release(cmd);
    }

    /// <summary>
    /// Part of this function is from the PostPorcessPass.cs from unity library
    /// </summary>
    /// <param name="cmq"></param>
    /// <param name="source"></param>
    private void SetupBloom(CommandBuffer cmd, RTHandle source)
    {
        // Start at half-res
        int downres = 1;
        int tw = m_Descriptor.width >> downres;
        int th = m_Descriptor.height >> downres;

        // Determine the iteration count
        int maxSize = Mathf.Max(tw, th);
        int iterations = Mathf.FloorToInt(Mathf.Log(maxSize, 2f) - 1);
        int mipCount = Mathf.Clamp(iterations, 1, m_BloomEffect.maxInteractions.value);

        // Pre-filtering parameters
        float clamp = m_BloomEffect.clamp.value;
        float threshold = Mathf.GammaToLinearSpace(m_BloomEffect.threshold.value);
        float thresholdKnee = threshold * 0.5f; // Hardcoded soft knee

        // Material setup
        float scatter = Mathf.Lerp(0.05f, 0.95f, m_BloomEffect.scatter.value);
        var bloomMaterial = m_bloomMaterial;
        bloomMaterial.SetVector("_Params", new Vector4(scatter, clamp, threshold, thresholdKnee));

        // Prefilter
        var desc = GetCompatibleDescriptor(tw, th, hdrFormat);
        for (int i = 0; i < mipCount; i++)
        {
            RenderingUtils.ReAllocateIfNeeded(ref m_BloomMipUp[i], desc, FilterMode.Bilinear, TextureWrapMode.Clamp, name: m_BloomMipUp[i].name);
            RenderingUtils.ReAllocateIfNeeded(ref m_BloomMipDown[i], desc, FilterMode.Bilinear, TextureWrapMode.Clamp, name: m_BloomMipDown[i].name);
            desc.width = Mathf.Max(1, desc.width >> 1);
            desc.height = Mathf.Max(1, desc.height >> 1);
        }

        Blitter.BlitCameraTexture(cmd, source, m_BloomMipDown[0], RenderBufferLoadAction.DontCare, RenderBufferStoreAction.Store, bloomMaterial, 0);

        // Downsample - gaussian pyramid
        var lastDown = m_BloomMipDown[0];
        for (int i = 1; i < mipCount; i++)
        {
            // Classic two pass gaussian blur - use mipUp as a temporary target
            //   First pass does 2x downsampling + 9-tap gaussian
            //   Second pass does 9-tap gaussian using a 5-tap filter + bilinear filtering
            Blitter.BlitCameraTexture(cmd, lastDown, m_BloomMipUp[i], RenderBufferLoadAction.DontCare, RenderBufferStoreAction.Store, bloomMaterial, 1);
            Blitter.BlitCameraTexture(cmd, m_BloomMipUp[i], m_BloomMipDown[i], RenderBufferLoadAction.DontCare, RenderBufferStoreAction.Store, bloomMaterial, 2);

            lastDown = m_BloomMipDown[i];
        }

        // Upsample (bilinear by default, HQ filtering does bicubic instead
        for (int i = mipCount - 2; i >= 0; i--)
        {
            var lowMip = (i == mipCount - 2) ? m_BloomMipDown[i + 1] : m_BloomMipUp[i + 1];
            var highMip = m_BloomMipDown[i];
            var dst = m_BloomMipUp[i];

            cmd.SetGlobalTexture("_SourceTextLowMip", lowMip);
            Blitter.BlitCameraTexture(cmd, highMip, dst, RenderBufferLoadAction.DontCare, RenderBufferStoreAction.Store, bloomMaterial, 3);
        }

        cmd.SetGlobalTexture("_Bloom_Texture", m_BloomMipUp[0]);
        cmd.SetGlobalFloat("_BloomIntensity", m_BloomEffect.intensity.value);


    }

    RenderTextureDescriptor GetCompatibleDescriptor()
            => GetCompatibleDescriptor(m_Descriptor.width, m_Descriptor.height, m_Descriptor.graphicsFormat);

    RenderTextureDescriptor GetCompatibleDescriptor(int width, int height, GraphicsFormat format, DepthBits depthBufferBits = DepthBits.None)
        => GetCompatibleDescriptor(m_Descriptor, width, height, format, depthBufferBits);

    internal static RenderTextureDescriptor GetCompatibleDescriptor(RenderTextureDescriptor desc, int width, int height, GraphicsFormat format, DepthBits depthBufferBits = DepthBits.None)
    {
        desc.depthBufferBits = (int)depthBufferBits;
        desc.msaaSamples = 1;
        desc.width = width;
        desc.height = height;
        desc.graphicsFormat = format;
        return desc;
    }


    public void SetTarget(RTHandle cameraColorTargetHandle, RTHandle cameraDepthTargetHandle)
    {
        //Debug.LogError("Setting Color Target");
        m_CameraColorTarget = cameraColorTargetHandle;
        m_CameraDepthTarget = cameraDepthTargetHandle;
    }
}
Technical Approach:
- Multi-resolution pyramid for efficient bloom calculation
- Separate down-sampling and up-sampling passes for quality
- Gaussian blur implementation across multiple scales
- Proper resource management with temporary render textures
CustomPostProcessRenderFeature.cs
Integration with Unity’s URP:
1
2
3
4
5
6
7
8
9
10
11
12
13
14
15
16
17
18
19
20
21
22
23
24
25
26
27
28
29
30
31
32
33
34
35
36
37
38
39
40
41
42
43
44
45
46
using UnityEngine;
using UnityEngine.Rendering.Universal;
using UnityEngine.Rendering;

[System.Serializable]
public class CustomPostProcessRenderFeature : ScriptableRendererFeature
{
    [SerializeField]
    private Shader m_bloomShader;

    [SerializeField]
    private Shader m_compositeShader;

    private Material m_bloomMaterial;
    private Material m_compositeMaterial;

    private CustomPostProcessPass m_customPass;

    public override void AddRenderPasses(ScriptableRenderer renderer, ref RenderingData renderingData){
        renderer.EnqueuePass(m_customPass);
    }

    public override void Create(){
        m_bloomMaterial = CoreUtils.CreateEngineMaterial(m_bloomShader);
        m_compositeMaterial = CoreUtils.CreateEngineMaterial(m_compositeShader);

        // If I have more render passes, I can create more passes here
        m_customPass = new CustomPostProcessPass(m_bloomMaterial, m_compositeMaterial);
    }

    protected override void Dispose(bool disposing){
        CoreUtils.Destroy(m_bloomMaterial);
        CoreUtils.Destroy(m_compositeMaterial);
    }

    public override void SetupRenderPasses(ScriptableRenderer renderer, in RenderingData renderingData)
    {
        if(renderingData.cameraData.cameraType == CameraType.Game)
        {
            m_customPass.ConfigureInput(ScriptableRenderPassInput.Depth);
            m_customPass.ConfigureInput(ScriptableRenderPassInput.Color);
            m_customPass.SetTarget(renderer.cameraColorTargetHandle, renderer.cameraDepthTargetHandle);
        }
    }

}
Integration Points:
- Render pass event timing for correct rendering order
- Volume system integration for parameter access
- Conditional execution based on effect activation
- Proper pass enqueueing in render pipeline
Technical Challenges & Solutions
Challenge 1
Consistent Outlines on Low-Poly Geometry
Problem: Traditional outline techniques (vertex extrusion, inverted hull) produce uneven results on low-poly models with sharp edges and distinct faces.
Solution: Developed hybrid outline system combining:
- Normal-based detection for silhouette edges
- Depth-based detection for internal geometric edges
- Custom smoothing parameters controlling outline intensity based on edge angles
- Post-processing approach processing entire scene uniformly
Result: Consistent, visually appealing outlines across all geometry types, from simple planes to complex character models.
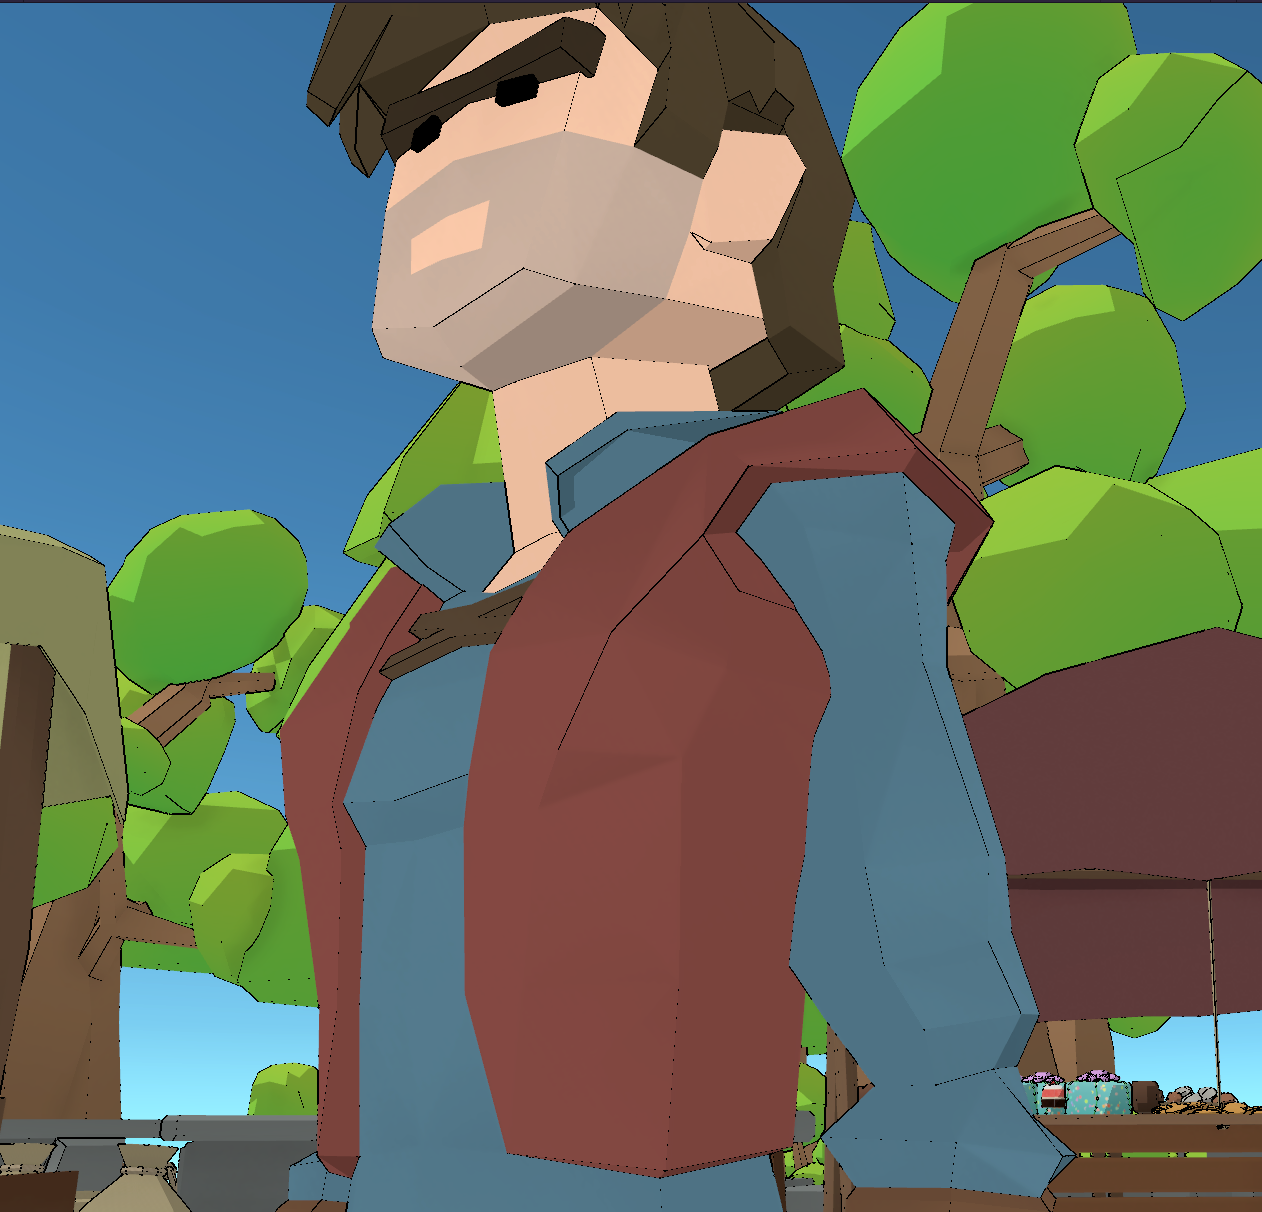
Figure 10: Inconsistent Outline
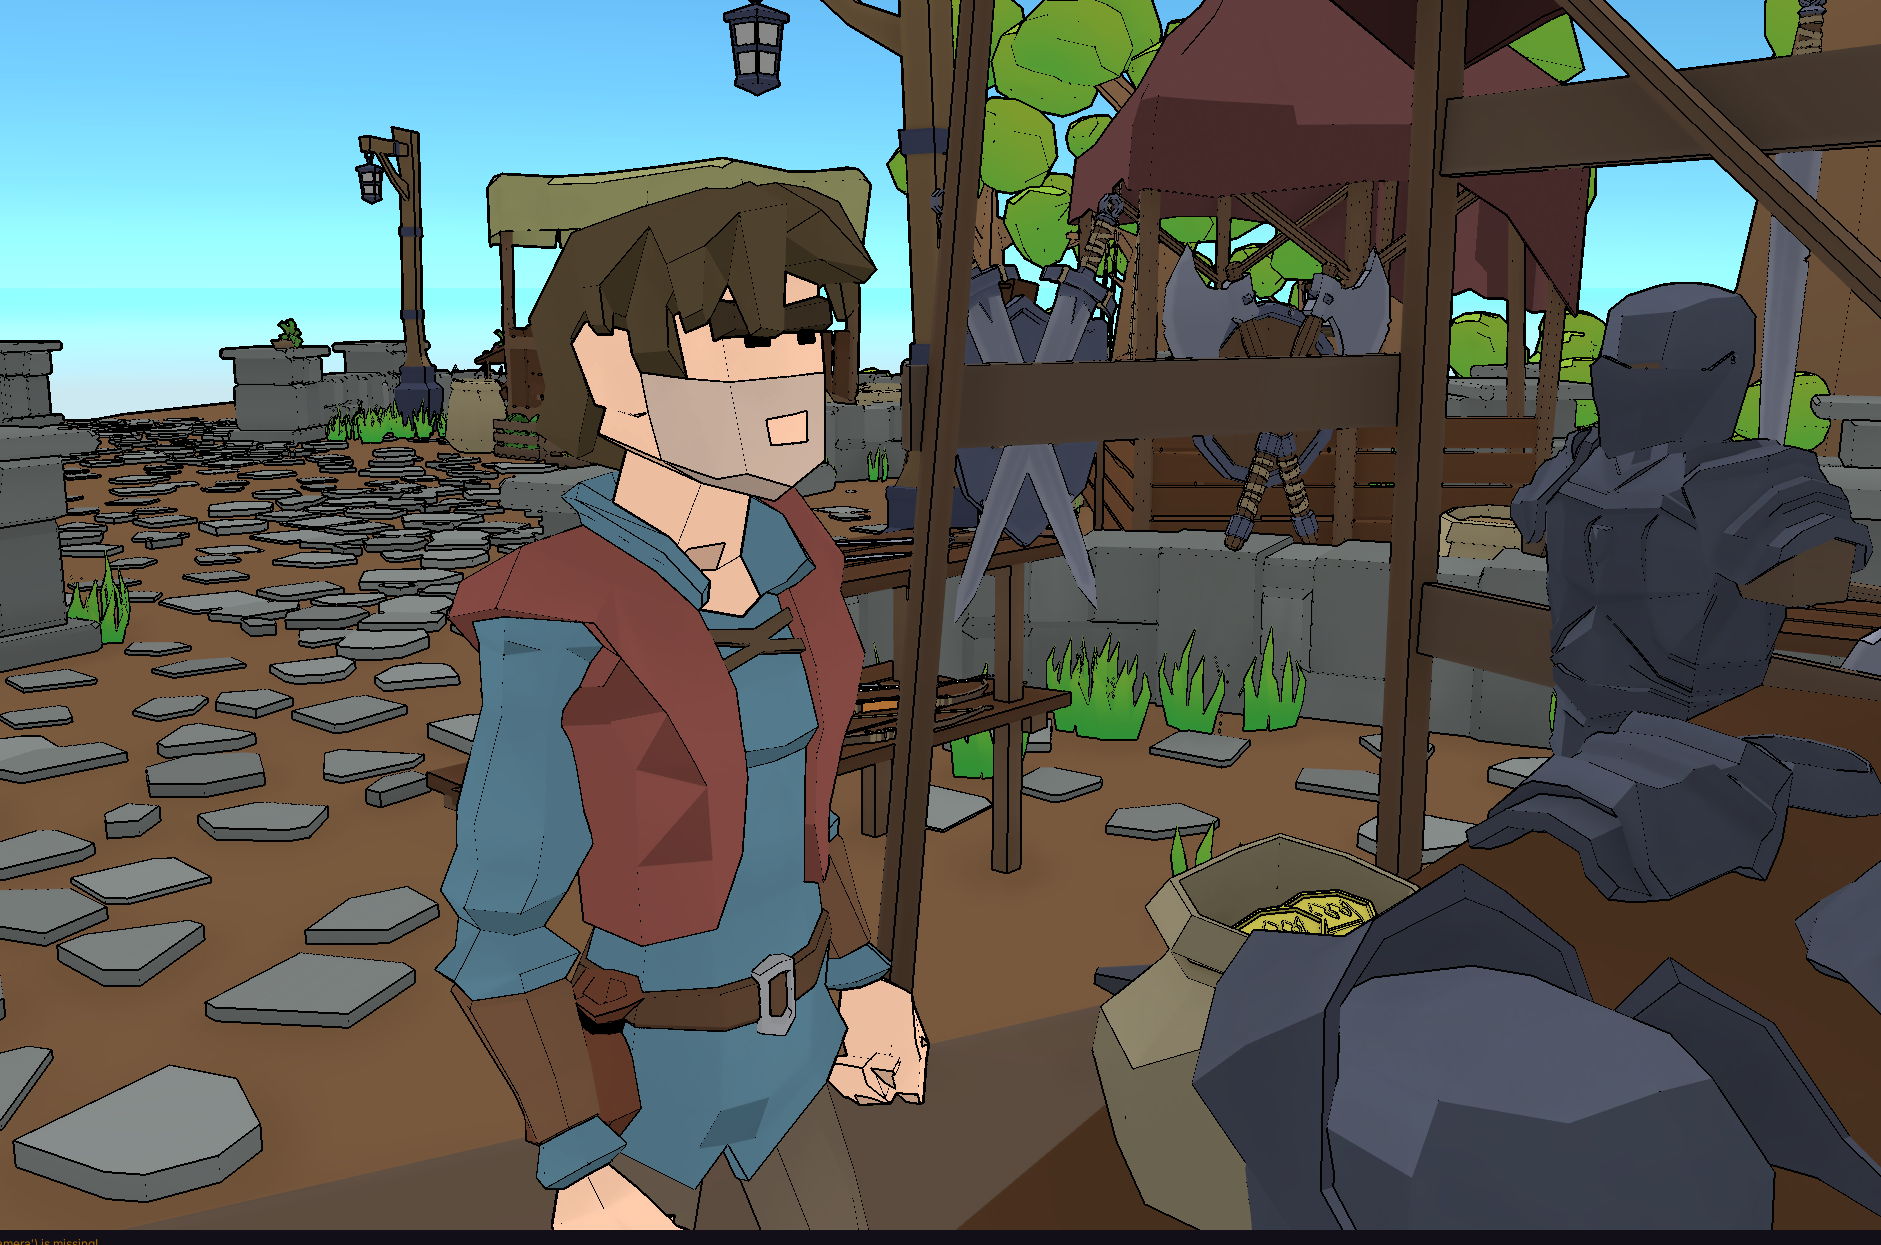
Figure 11: More consistent outline
Challenge 2
Scriptable Render Pipeline Learning Curve
Problem: Limited documentation for Unity’s Scriptable Render Pipeline made implementing custom bloom challenging. Trial-and-error process consuming significant development time.
Solution:
- Extensive research across multiple tutorial sources
- Reverse-engineering Unity’s built-in post-processing effects
- Iterative testing with simplified implementations
- Building from basic single-pass to complex multi-pass system
- Community forum consultation for specific issues
Learning: Deep understanding of render pipeline architecture, render texture management, and multi-pass rendering techniques.
Challenge 3
Artist-Friendly Parameter Exposure
Problem: Complex shader systems often intimidating for non-technical users.
Solution:
- Clear parameter naming with descriptive tooltips
- Logical grouping of related settings in Inspector
- Sensible default values requiring minimal adjustment
- Visual feedback through real-time preview
- Comprehensive documentation with usage examples
Result: Designers can achieve desired aesthetic without shader programming knowledge.
Artistic Inspiration & Analysis
Hi-Fi Rush Influence
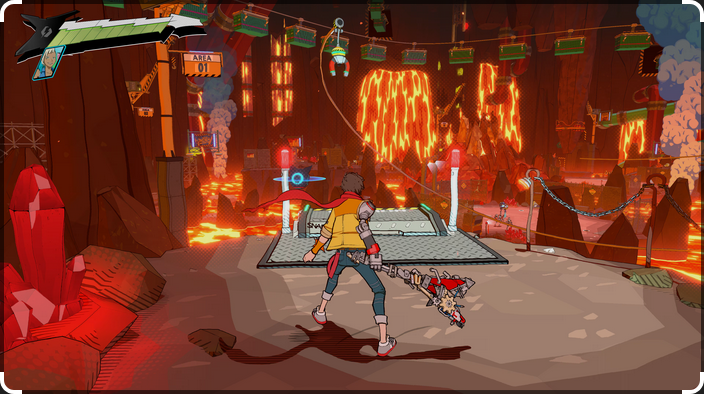
Figure 12: Hi-Fi Rush environment details
Studied Hi-Fi Rush’s vibrant, rhythm-driven visual style:
Key Observations:
- Intense, saturated color palettes enhancing gameplay clarity
- Custom bloom emphasizing beat-matching visual feedback
- High-contrast lighting supporting rhythm mechanics
- Clean geometric shapes with strong silhouettes
Implementation: Custom bloom system specifically designed to replicate Hi-Fi Rush’s distinctive glow effect, allowing texture-based masking for precise control.
Borderlands Comic Book Aesthetic
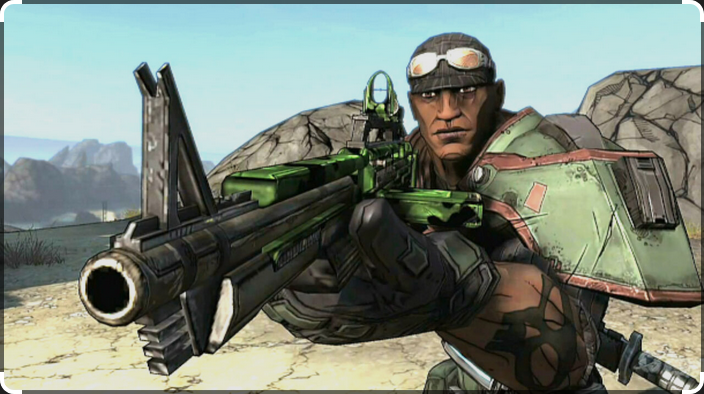
Figure 13: Borderlands details
Analyzed Borderlands’ unique cel-shaded appearance:
Key Observations:
- Thick, prominent black outlines creating hand-drawn look
- High-contrast lighting with distinct shadow bands
- Texture-based details combined with flat shading
- Comic book panel-inspired composition
Implementation: Outline system parameters tuned to achieve similar bold outlines while maintaining performance on low-poly models.
Visual Longevity Research
Keo’s (2017) concept of “visual longevity” influenced design decisions:
Principle: Stylized graphics resist technical aging better than photorealism
Application:
- Simplified geometric forms with artistic enhancement
- Focus on strong art direction over technical complexity
- Timeless aesthetic not tied to current rendering capabilities
- Artistic expression prioritized over graphical realism
Learning Outcomes
Technical Skills Developed
Graphics Programming: Deep understanding of shader development, render pipelines, and post-processing effects
Shader Graph Mastery: Proficiency in visual shader creation, node-based programming, and parameter management
C# Render Pipeline Extension: Ability to extend Unity’s rendering system with custom features and passes
Performance Optimization: Techniques for maintaining real-time performance with custom rendering effects
Technical Art: Bridging programmer and artist workflows through tool development
Game Development Insights
NPR Techniques: Comprehensive knowledge of non-photorealistic rendering approaches and their applications
Art Direction: Understanding how technical choices affect artistic expression and player perception
Tool Development: Creating artist-friendly systems that don’t require programming knowledge
Research Methodology: Analyzing commercial games to understand implementation techniques
Documentation: Importance of clear technical documentation for complex systems
System Architecture Benefits
For Technical Artists
- Visual Programming: Shader Graph eliminates code barrier for shader creation
- Real-Time Feedback: Immediate visual results when adjusting parameters
- Modular Design: Components can be used independently or combined
- Version Control Friendly: Text-based Shader Graph files work well with Git
For Programmers
- Extensible Architecture: Clear separation between shader logic and render passes
- Maintainable Code: Well-structured C# scripts following Unity conventions
- Performance Conscious: Optimized rendering paths with minimal overhead
- Documented System: Inline comments and technical documentation
For Game Designers
- Artistic Control: All parameters accessible through familiar Unity Inspector
- Style Versatility: Single system supports multiple artistic directions
- Quick Iteration: Changes visible immediately without compilation
- No Code Required: Complete control without touching shader code
Future Enhancements
If expanding this project, I would implement:
Dynamic Lighting Support
- Currently optimized for static lighting
- Extend shader to handle dynamic directional, point, and spot lights
- Implement light accumulation for multiple light sources
- Maintain toon aesthetic with dynamic lighting calculations
Mobile Platform Optimization
- Create simplified shader variants for mobile GPUs
- Implement quality settings for scalable performance
- Optimize render passes for tile-based rendering
- Reduce texture memory usage for mobile constraints
Additional Stylistic Variations
- Watercolor-style shader with paper texture effects
- Hatching/cross-hatching for shadow rendering
- Paint stroke simulation for artistic variation
- Customizable pattern overlays for unique styles
Runtime Style Switching
- System for transitioning between different shader configurations
- Gameplay-driven visual changes tied to game events
- Smooth parameter interpolation during transitions
- Preset management system for quick style changes
Advanced Material System
- Support for more complex material properties
- Subsurface scattering for specific material types
- Anisotropic highlights for specialized surfaces
- Texture-based detail enhancement
Technical Specifications
Engine: Unity 2022.3 LTS
Rendering Pipeline: Universal Render Pipeline (URP) 14.0.11
Programming: C#, Shader Graph
Platform:: PC
Development Tools: Unity Editor, Visual Studio, Shader Graph
Assets Used: Asset Store (Low-Poly Medieval Market, Polygon Fantasy Characters)
Reflection
Developing this toon shader system was an enlightening journey into graphics programming and technical art. This project opened my eyes to an area of game development I had never thoroughly explored before - the intricate relationship between technical implementation and artistic expression.
The most significant challenge was implementing the custom bloom effect through the Scriptable Render Pipeline. With limited documentation available for this relatively new Unity feature, I spent considerable time in trial-and-error experimentation. While frustrating initially, this process forced me to develop a deep understanding of render pipeline architecture, which will prove invaluable in future projects.
I’m particularly proud of the hybrid outline solution. Traditional outline techniques consistently failed on low-poly geometry, producing inconsistent or broken results. The combination of normal-based and depth-based detection represents original problem-solving that addresses a real technical challenge in stylized rendering.
If I could restart this project, I would allocate more time to researching the Scriptable Render Pipeline before implementation. Establishing a stronger theoretical foundation would have accelerated development and reduced frustration. Additionally, I would implement a more robust testing framework with diverse low-poly models to identify edge cases earlier.
The research into games like Hi-Fi Rush and Borderlands provided valuable context for understanding how commercial studios approach stylized rendering. Analyzing their techniques revealed that successful non-photorealistic rendering requires careful balance between technical sophistication and artistic restraint.
This project significantly expanded my skill set, combining graphics programming, shader development, and technical art. More importantly, it taught me to think from both programmer and artist perspectives - a critical skill for creating tools that empower creative expression without requiring technical expertise.
The resulting shader system successfully demonstrates how toon shading can enhance low-poly aesthetics while providing extensive artistic control. While there’s room for future enhancements, particularly in dynamic lighting support and mobile optimization, the current implementation achieves its core objective: creating a versatile, artist-friendly framework for stylized low-poly rendering.
References
Keo, M (2017) Graphical Style in Video Games. Bachelor’s Thesis. Available at: https://core.ac.uk/download/pdf/93082889.pdf (Accessed: 18 April 2025)
Academic Context
Institution: Anglia Ruskin University, Cambridge
Course: BSc Computer Games Technology
Module: MOD008624 - Major Project for Games
Component: 010-2 - Technical Implementation
Grade: A
Academic Year: 2024/25
This project served as both practical implementation and academic research into non-photorealistic rendering techniques, contributing to understanding of how stylized graphics can create visually distinctive games with strong artistic direction.
Links
- GitHub Repository View the complete source code
- Download the demo and the full academic research
This project demonstrates my ability to implement advanced graphics techniques using modern game engine tools, extend rendering pipelines with custom features, and create artist-friendly systems that balance technical sophistication with accessibility. It showcases both graphics programming skills and understanding of non-photorealistic rendering principles.